The Black Friday is Here! 50% OFF with code BLACKFRIDAY24

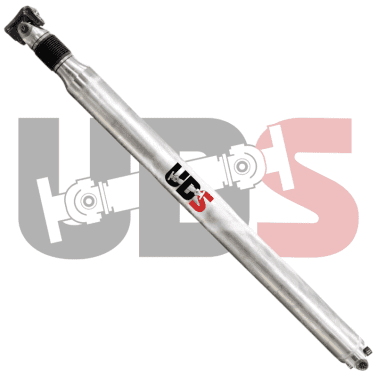
Conversion Driveshaft – Flange to U-Joint – Aluminum, 5″ OD, Ford F250/F350, 4WD, Super Duty Truck

$1,664.85

Weld Yoke Material:
Aluminum 6061-T6 Forged Yoke
Tube Material: 0.125 Inch WALL 6061-T6 Seamless
Tube Outside Diameter: 5 Inch OD
Transfer Case Flange Yoke: 3-2-1719
Front U-Joint: U-Joint: Spicer SPL55XU (1480 Series)
1 3/8 Inch (1.375 Inch) Cap x 4.188 Inch Span
Premium Non-Greasable
Differential U-Joint: U-Joint: 5-1410XU (1410 Series)
1.188 Inch Cap x 4.188 Inch Span
Premium Non-Greasable
Custom Length Options:
Max length 88.00 inches flat to center of u-joint.

Conversion Driveshaft – Flange to U-Joint – Aluminum, 5″ OD, Ford F250/F350, 4WD, Super Duty Truck

$1,664.85

Vehicle

Ford

Tube Diameter

5" OD

Year

2000 – 2018

LENGTH

Custom

Max Length

88.00"

Material

ALUMINUM

SERIES

1410

Model

F250/F350 SD

Weight 20 lbs
Dimensions 75 × 4 × 4 in
  • Required Driveshaft Measurements:

    We invite you to proceed with your order today, and anticipate sending a follow-up communication to gather essential details. Alternatively, you may expedite the process by providing your measurements below. Please measure from the transfer case seal to the flat face of the differential, where the driveshaft's 4-bolt flange is mounted. Your driveshaft order remains pending until we receive this vital information.

    *Driveshaft Length

    Write your driveshaft length here.

Scroll to Top

Two Piece Driveshaft: Flange

Two Piece Driveshaft Measuring Flange to End Yoke

IMPORTANT: Vehicle must be on a level surface with suspension at normal ride height for proper measurements. When measuring to the center bearing, measure to the center of the round or slotted carrier bearing bolt holes.  Many carrier mounts are slotted for adjustment.

DriveShaft Length

Measurement (A) :
Measure from the transmission output flange face to the center of the carrier bearing bolt holes.

Measurement (B) :
Measure from the center of carrier bearing bolt holes to the flats (center of u-joint or flats) on the end yoke at the differential.

Two Piece Driveshaft Measuring Flange To Flange

IMPORTANT: Vehicle must be on a level surface with suspension at normal ride height for proper measurements. When measuring to the center bearing, measure to the center of the round or slotted carrier bearing bolt holes.  Many carrier mounts are slotted for adjustment.

DriveShaft Length

Measurement (A):
Measure from the transmission output flange face to the center of the carrier bearing bolt holes.

Measurement (B) :
Measure from the center of carrier bearing bolt holes to the face of the flange on the differential.

Two Piece Driveshaft: Rubber Boot Extension

Two Piece Driveshaft Measuring Rubber Boot Extension to End Yoke

IMPORTANT: Vehicle must be on a level surface with suspension at normal ride height for proper measurements. When measuring to the center bearing, measure to the center of the round or slotted carrier bearing bolt holes.  Many carrier mounts are slotted for adjustment.

DriveShaft Length

Measurement (A) :
Measure from end of rubber boot extension on the transmission to the center of the carrier bearing bolt holes.

Measurement (B) :
Measure from the center of carrier bearing bolt holes to the end yoke flats (center of u-joint or flats) on the differential.

Measurement (C) :
Measure from the end of the rubber boot extension to end the of the transmission output/spline. If spline is recessed in rubber boot Extension, enter ø.

Two Piece Driveshaft Measuring Rubber Boot Extension to Flange

IMPORTANT: Vehicle must be on a level surface with suspension at normal ride height for proper measurements. When measuring to the center bearing, measure to the center of the round or slotted carrier bearing bolt holes.  Many carrier mounts are slotted for adjustment.

DriveShaft Length

Measurement (A) :
Measure from end of rubber boot extension on the transmission to the center of the carrier bearing bolt holes.

Measurement (B) :
Measure from the center of carrier bearing bolt holes to the flange face on the differential.

Measurement (C) :
Measure from the end of the rubber boot extension to end the of the transmission output/spline. If spline is recessed in rubber boot Extension, enter ø.

Two Piece Driveshaft: End Yoke

Two Piece Driveshaft Measuring End Yoke To End Yoke

IMPORTANT: Vehicle must be on a level surface with suspension at normal ride height for proper measurements. When measuring to the center bearing, measure to the center of the round or slotted carrier bearing bolt holes.  Many carrier mounts are slotted for adjustment.

DriveShaft Length

Measurement (A):
from the transmission output end yoke (center of u-joint or flats) to the center of the carrier bearing bolt holes.

Measurement (B):
Measure from the center of carrier bearing bolt holes to the end yoke (center of u-joint or flats) on the differential.

Two Piece Driveshaft Measuring End Yoke To Flange

IMPORTANT: Vehicle must be on a level surface with suspension at normal ride height for proper measurements. When measuring to the center bearing, measure to the center of the round or slotted carrier bearing bolt holes.  Many carrier mounts are slotted for adjustment.

DriveShaft Length

Measurement (A) :
Measure from the transmission output end yoke (center of u-joint or flats) to the center of the carrier bearing bolt holes.

Measurement (B) :
Measure from the center of carrier bearing bolt holes to the face of the flange on the differential.

Two Piece Driveshaft: Seal

Seal to End Yoke

 IMPORTANT: Vehicle must be on a level surface with suspension at normal ride height for proper measurements. When measuring to the center bearing, measure to the center of the round or slotted carrier bearing bolt holes.  Many carrier mounts are slotted for adjustment.

DriveShaft Length

Measurement (A) – Front Driveshaft Length:
Measure from end of rubber seal on the transmission to the center of the carrier bearing bolt holes.

Measurement (B) – Rear Driveshaft Length:
Measure from the center of carrier bearing bolt holes to the end yoke flats (center of ujoint) on the differential.

Spline Extrusion Length

Measurement (C) – Spline Extrusion Length:
Measure from rubber seal to end the of the transmission output/spline. If spline is recessed in rubber seal, enter ø.

Seal to Flange

 IMPORTANT: Vehicle must be on a level surface with suspension at normal ride height for proper measurements. When measuring to the center bearing, measure to the center of the round or slotted carrier bearing bolt holes.  Many carrier mounts are slotted for adjustment.

DriveShaft Length

Measurement (A) – Front Driveshaft Length:
Measure from end of rubber seal on the transmission to the center of the carrier bearing bolt holes.

Measurement (B) – Rear Driveshaft Length:
Measure from the center of carrier bearing bolt holes to the end yoke flats (center of ujoint) on the differential.

Spline Extrusion Length

Measurement (C) – Spline Extrusion Length:
Measure from rubber seal to end the of the transmission output/spline. If spline is recessed in rubber seal, enter ø.

Inside Snap Ring Style Transmission Slip Yoke

E.) Cap Diameter:
Diameter measured over bearing cap space.

F.) Width:
Distance Measured Between Machined Flats

Common Inside Snap Ring U-joint Sizes and series

Series Width Cap Diameter
7260 CHRYSLER
2 1/8″ = 2.125
1 5/64″ = 1.078
7290 CHRYSLER
2 5/8″ = 2.625
1 1/8″ = 1.125
3R GM
2 9/16″ = 2.563
1 1/8″ = 1.125
Inside Snap Ring Style Transmission Slip Yoke form

Outside Snap Ring Style Transmission Slip Yoke

E.) Cap Diameter:
Diameter measured over bearing cap space.

F.) Width:
Distance measured over compressed bearing cap.

Common Outside Snap Ring U-joint Sizes and series

Series Width Cap Diameter
1210
2 7/16″ = 2.438
1 1/16″ = 1.063
1310
3 7/32″ = 3.219
1 1/16″ = 1.063
1310 FORD*
3 7/32″ = 3.219
1 1/8″ = 1.125
1330
3 5/8″ = 3.625
1 1/16″ = 1.063
1330 FORD*
3 5/8″ = 3.625
1 1/8″ = 1.125
1350
3 5/8″ = 3.625
1 1/16″ = 1.063
1410
4 3/16 = 4.188
1 3/16″ = 1.188
1415**
4.178
1 3/16″ = 1.188
1480
4 3/16 = 4.188
1 3/8″ = 1.375
1485**
4.178
1 3/8″ = 1.375
1550
4 31/32″ = 4.969
1 3/8″ = 1.375
1555**
4.9464
1 3/8″ = 1.375
outside Snap Ring Style Transmission Slip Yoke form

Inside Snap Ring Style End Yoke

Width: measure from the inside flat of one yoke ear to the inside flat of the other ear

Cap Diameter: measure the width of the opening where the cap sits in the yoke

Common Inside Snap Ring U-Joint Sizes and series

Series Width Cap Diameter
7260 CHRYSLER
2 1/8″ = 2.125
1 5/64″ = 1.078
7290 CHRYSLER
2 5/8″ = 2.625
1 1/8″ = 1.125
3R GM
2 9/16″ = 2.563
1 1/8″ = 1.125
Inside Snap Ring Style End Yoke

Outside Snap Ring Style End Yoke

Width: measure from inside of tab to inside of tab. If you do not see a tab as shown, then you have an inside snap ring U-Joint.

Cap Diameter: measure the width of the opening where the cap sits in the yoke

Common Outside Snap Ring U-Joint Sizes and series

Series Width Cap Diameter
1210
2 7/16″ = 2.438
1 1/16″ = 1.063
1310
3 7/32″ = 3.219
1 1/16″ = 1.063
1310 FORD*
3 7/32″ = 3.219
1 1/8″ = 1.125
1330
3 5/8″ = 3.625
1 1/16″ = 1.063
1330 FORD*
3 5/8″ = 3.625
1 1/8″ = 1.125
1350
3 5/8″ = 3.625
1 1/16″ = 1.063
1410
4 3/16 = 4.188
1 3/16″ = 1.188
1415**
4.178
1 3/16″ = 1.188
1480
4 3/16 = 4.188
1 3/8″ = 1.375
1485**
4.178
1 3/8″ = 1.375
1550
4 31/32″ = 4.969
1 3/8″ = 1.375
1555**
4.9464
1 3/8″ = 1.375
outside Snap Ring Style End Yoke

INSIDE SNAP RING STYLE U-JOINT

Width:
U Joint: Please measure the distance to the outer edge of the snap ring grooves.

End Yoke: Please measure from the inside flat of one yoke ear to the inside flat of the other ear

Use the picture above for reference

Cap Diameter:
U Joint: Simply measure the U-Joint cap.

End Yoke: Please measure the width of the opening where the cap sits in the yoke.

Use the picture above for reference

Common Inside Snap Ring U-joint Sizes and Series

Series Width Cap Diameter
7260 CHRYSLER
2 – 1⁄8 (2.125)
1 – 5⁄64 (1.078)
7290 CHRYSLER
2 – 5⁄8 (2.625)
1 – 1⁄8 (1.125)
3R GM
2 – 9⁄16 (2.563)
1 – 1⁄8 (1.125)
2R GM
2.342
1.00

OUTSIDE SNAP RING STYLE U-JOINT

Width:
U joint: Please compress the caps and measure from outside of cap to outside of cap .
End Yoke: Please measure from inside of tab to inside of tab, using the picture above for reference, If you do not see a tab as shown, then you have an inside snap ring u joint.
Use the picture above for reference

Cap Diameter:
U joint: Simply measure the U-Joint cap diameter .
End Yoke: Please measure the width of the opening where the cap sits in the yoke. use the picture above for reference
Use the picture above for reference

Common Outside Snap Ring U-joint Sizes and Series

Series Width Cap Diameter
1210
2 7/16″ = 2.438
1 1/16″ = 1.063
1310
3 7/32″ = 3.219
1 1/16″ = 1.063
1310 FORD*
3 7/32″ = 3.219
1 1/8″ = 1.125
1330
3 5/8″ = 3.625
1 1/16″ = 1.063
1330 FORD*
3 5/8″ = 3.625
1 1/8″ = 1.125
1350
3 5/8″ = 3.625
1 3/16″ = 1.188
1410
4 3/16 = 4.188
1 3/16″ = 1.188
1415**
4.178
1 3/16″ = 1.188
1480
4 3/16 = 4.188
1 3/8″ = 1.375
1485**
4.178
1 3/8″ = 1.375
1550
4 31/32″ = 4.969
1 3/8″ = 1.375
1555**
4.9464
1 3/8″ = 1.375

Create your new account.

0