The Black Friday is Here! 50% OFF with code BLACKFRIDAY24

10-4-183U

$22.81

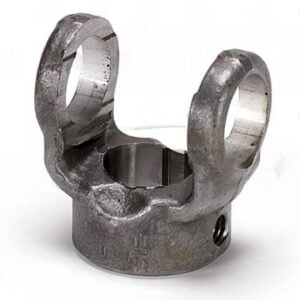
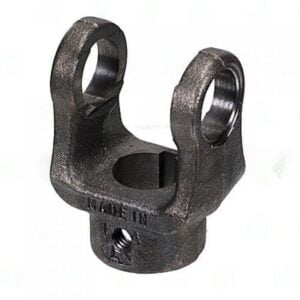
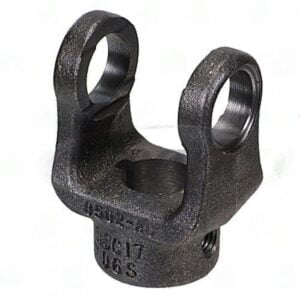
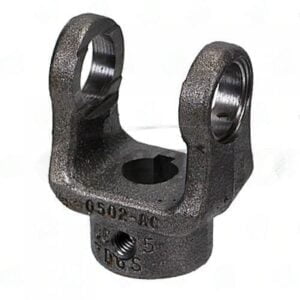
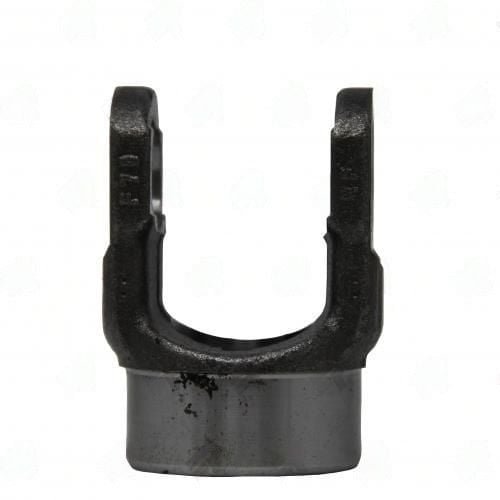
The Spicer 10-4-183 PTO end yoke is engineered for high-performance applications within the 1000 series. This yoke features a round bore design with a bore diameter of 1.250 inches, ensuring a reliable fit for various systems. The hub diameter measures 2.000 inches, providing a robust connection point, while the universal joint bearing diameter of 0.938 inches ensures smooth operation.

Designed with a universal joint retaining width of 1.500 inches, the 10-4-183 effectively accommodates high-angle applications, maintaining integrity under stress. The length through the bore is 1.030 inches, offering optimal alignment and stability. Additionally, the set screw, with a thread size of 0.375 inches, guarantees a secure fastening.

The keyway width of 0.250 inches and its placement at clock position 9 enhance the yoke’s functionality, while the inside snap ring style allows for easy installation and removal. With a centerline of joint to the end of the hub at 2.500 inches and a joint angle of 0.000 degrees, the Spicer 10-4-183 is built to perform in demanding environments, providing reliability and durability where it matters most.

10-4-183U

$22.81

BORE TYPE

round

CJ TO END

2.50

HUB DIA

2.25

KEYWAY

GAP-0.25

Partn number

10-4-183

remaining stock

<10

SERIES

1000

Through hole

1.19

BORE DIA

1.250

Weight 7 lbs
Dimensions 25 × 18 × 10 in

Availability: 2 in stock

Scroll to Top

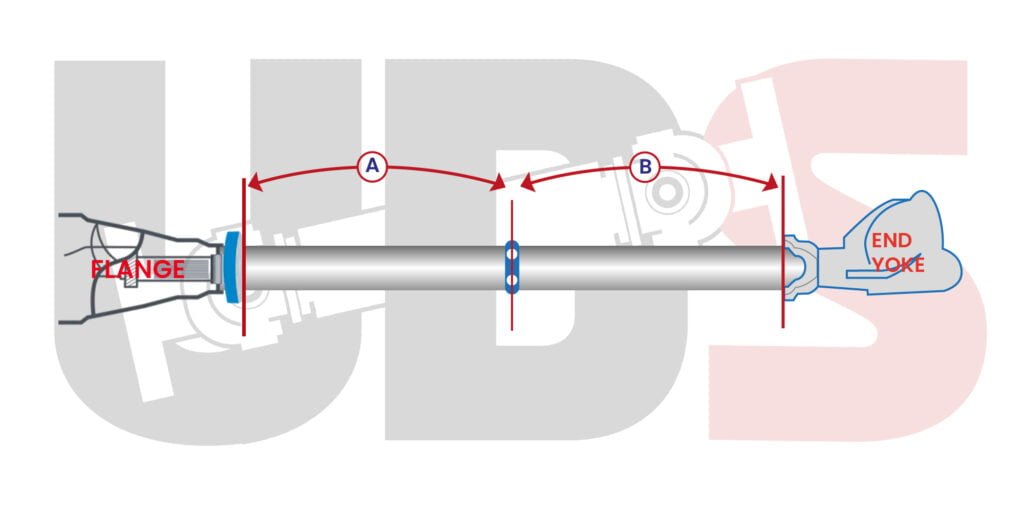
Two Piece Driveshaft: Flange

Two Piece Driveshaft Measuring Flange to End Yoke

IMPORTANT: Vehicle must be on a level surface with suspension at normal ride height for proper measurements. When measuring to the center bearing, measure to the center of the round or slotted carrier bearing bolt holes.  Many carrier mounts are slotted for adjustment.

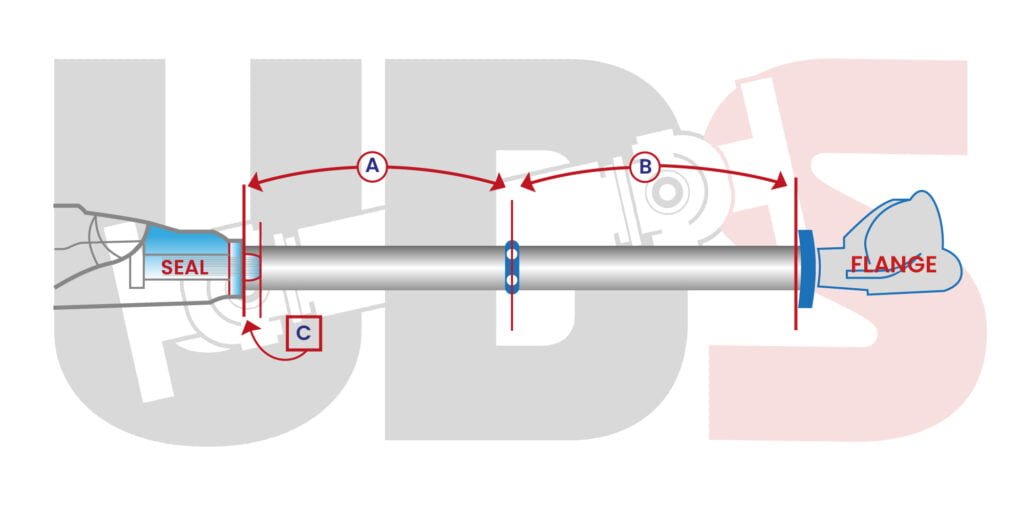
DriveShaft Length

Measurement (A) :
Measure from the transmission output flange face to the center of the carrier bearing bolt holes.

Measurement (B) :
Measure from the center of carrier bearing bolt holes to the flats (center of u-joint or flats) on the end yoke at the differential.

Two Piece Driveshaft Measuring Flange To Flange

IMPORTANT: Vehicle must be on a level surface with suspension at normal ride height for proper measurements. When measuring to the center bearing, measure to the center of the round or slotted carrier bearing bolt holes.  Many carrier mounts are slotted for adjustment.

DriveShaft Length

Measurement (A):
Measure from the transmission output flange face to the center of the carrier bearing bolt holes.

Measurement (B) :
Measure from the center of carrier bearing bolt holes to the face of the flange on the differential.

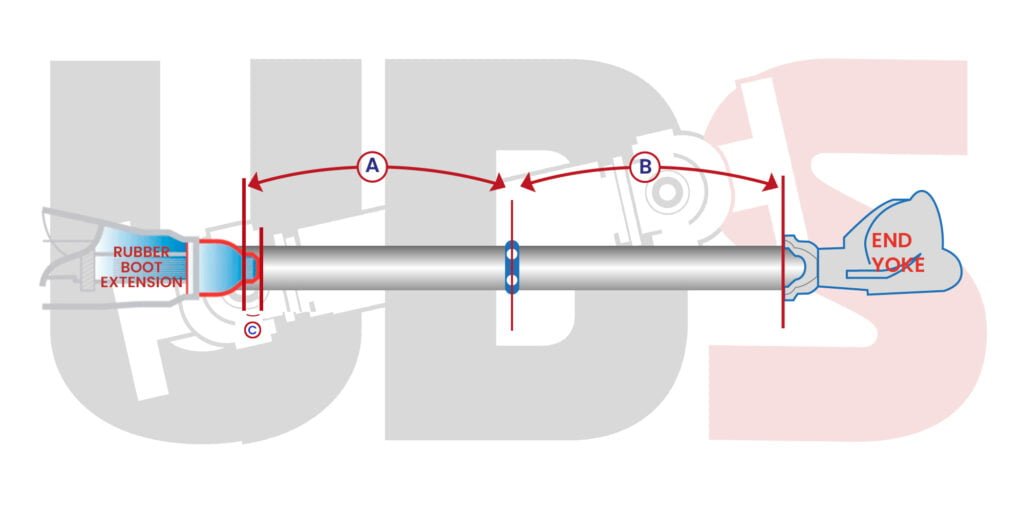
Two Piece Driveshaft: Rubber Boot Extension

Two Piece Driveshaft Measuring Rubber Boot Extension to End Yoke

IMPORTANT: Vehicle must be on a level surface with suspension at normal ride height for proper measurements. When measuring to the center bearing, measure to the center of the round or slotted carrier bearing bolt holes.  Many carrier mounts are slotted for adjustment.

DriveShaft Length

Measurement (A) :
Measure from end of rubber boot extension on the transmission to the center of the carrier bearing bolt holes.

Measurement (B) :
Measure from the center of carrier bearing bolt holes to the end yoke flats (center of u-joint or flats) on the differential.

Measurement (C) :
Measure from the end of the rubber boot extension to end the of the transmission output/spline. If spline is recessed in rubber boot Extension, enter ø.

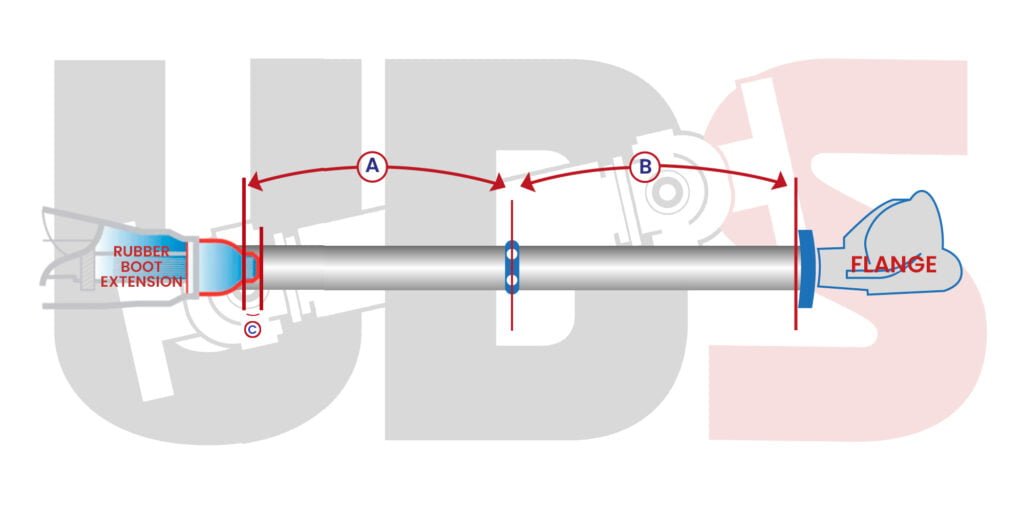
Two Piece Driveshaft Measuring Rubber Boot Extension to Flange

IMPORTANT: Vehicle must be on a level surface with suspension at normal ride height for proper measurements. When measuring to the center bearing, measure to the center of the round or slotted carrier bearing bolt holes.  Many carrier mounts are slotted for adjustment.

DriveShaft Length

Measurement (A) :
Measure from end of rubber boot extension on the transmission to the center of the carrier bearing bolt holes.

Measurement (B) :
Measure from the center of carrier bearing bolt holes to the flange face on the differential.

Measurement (C) :
Measure from the end of the rubber boot extension to end the of the transmission output/spline. If spline is recessed in rubber boot Extension, enter ø.

Two Piece Driveshaft: End Yoke

Two Piece Driveshaft Measuring End Yoke To End Yoke

IMPORTANT: Vehicle must be on a level surface with suspension at normal ride height for proper measurements. When measuring to the center bearing, measure to the center of the round or slotted carrier bearing bolt holes.  Many carrier mounts are slotted for adjustment.

DriveShaft Length

Measurement (A):
from the transmission output end yoke (center of u-joint or flats) to the center of the carrier bearing bolt holes.

Measurement (B):
Measure from the center of carrier bearing bolt holes to the end yoke (center of u-joint or flats) on the differential.

Two Piece Driveshaft Measuring End Yoke To Flange

IMPORTANT: Vehicle must be on a level surface with suspension at normal ride height for proper measurements. When measuring to the center bearing, measure to the center of the round or slotted carrier bearing bolt holes.  Many carrier mounts are slotted for adjustment.

DriveShaft Length

Measurement (A) :
Measure from the transmission output end yoke (center of u-joint or flats) to the center of the carrier bearing bolt holes.

Measurement (B) :
Measure from the center of carrier bearing bolt holes to the face of the flange on the differential.

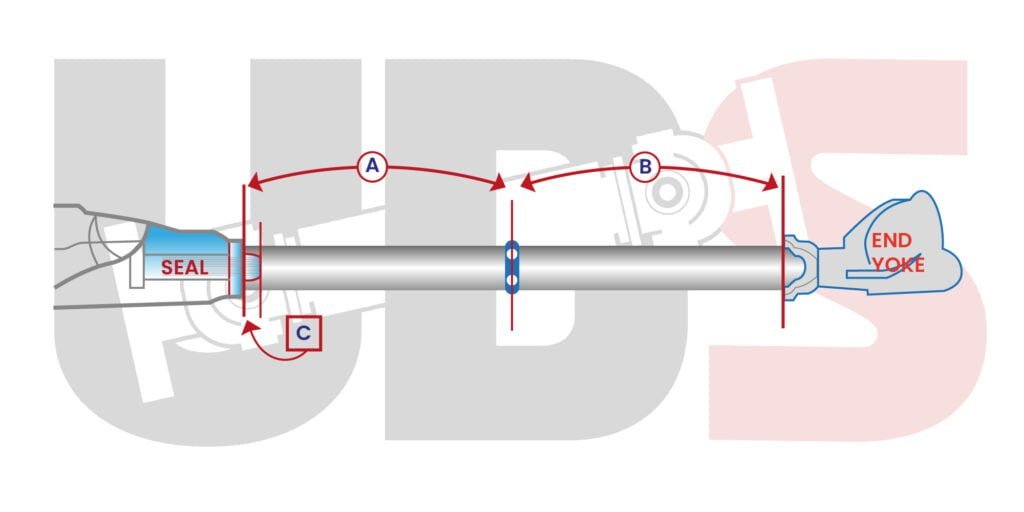
Two Piece Driveshaft: Seal

Seal to End Yoke

 IMPORTANT: Vehicle must be on a level surface with suspension at normal ride height for proper measurements. When measuring to the center bearing, measure to the center of the round or slotted carrier bearing bolt holes.  Many carrier mounts are slotted for adjustment.

DriveShaft Length

Measurement (A) – Front Driveshaft Length:
Measure from end of rubber seal on the transmission to the center of the carrier bearing bolt holes.

Measurement (B) – Rear Driveshaft Length:
Measure from the center of carrier bearing bolt holes to the end yoke flats (center of ujoint) on the differential.

Spline Extrusion Length

Measurement (C) – Spline Extrusion Length:
Measure from rubber seal to end the of the transmission output/spline. If spline is recessed in rubber seal, enter ø.

Seal to Flange

 IMPORTANT: Vehicle must be on a level surface with suspension at normal ride height for proper measurements. When measuring to the center bearing, measure to the center of the round or slotted carrier bearing bolt holes.  Many carrier mounts are slotted for adjustment.

DriveShaft Length

Measurement (A) – Front Driveshaft Length:
Measure from end of rubber seal on the transmission to the center of the carrier bearing bolt holes.

Measurement (B) – Rear Driveshaft Length:
Measure from the center of carrier bearing bolt holes to the end yoke flats (center of ujoint) on the differential.

Spline Extrusion Length

Measurement (C) – Spline Extrusion Length:
Measure from rubber seal to end the of the transmission output/spline. If spline is recessed in rubber seal, enter ø.

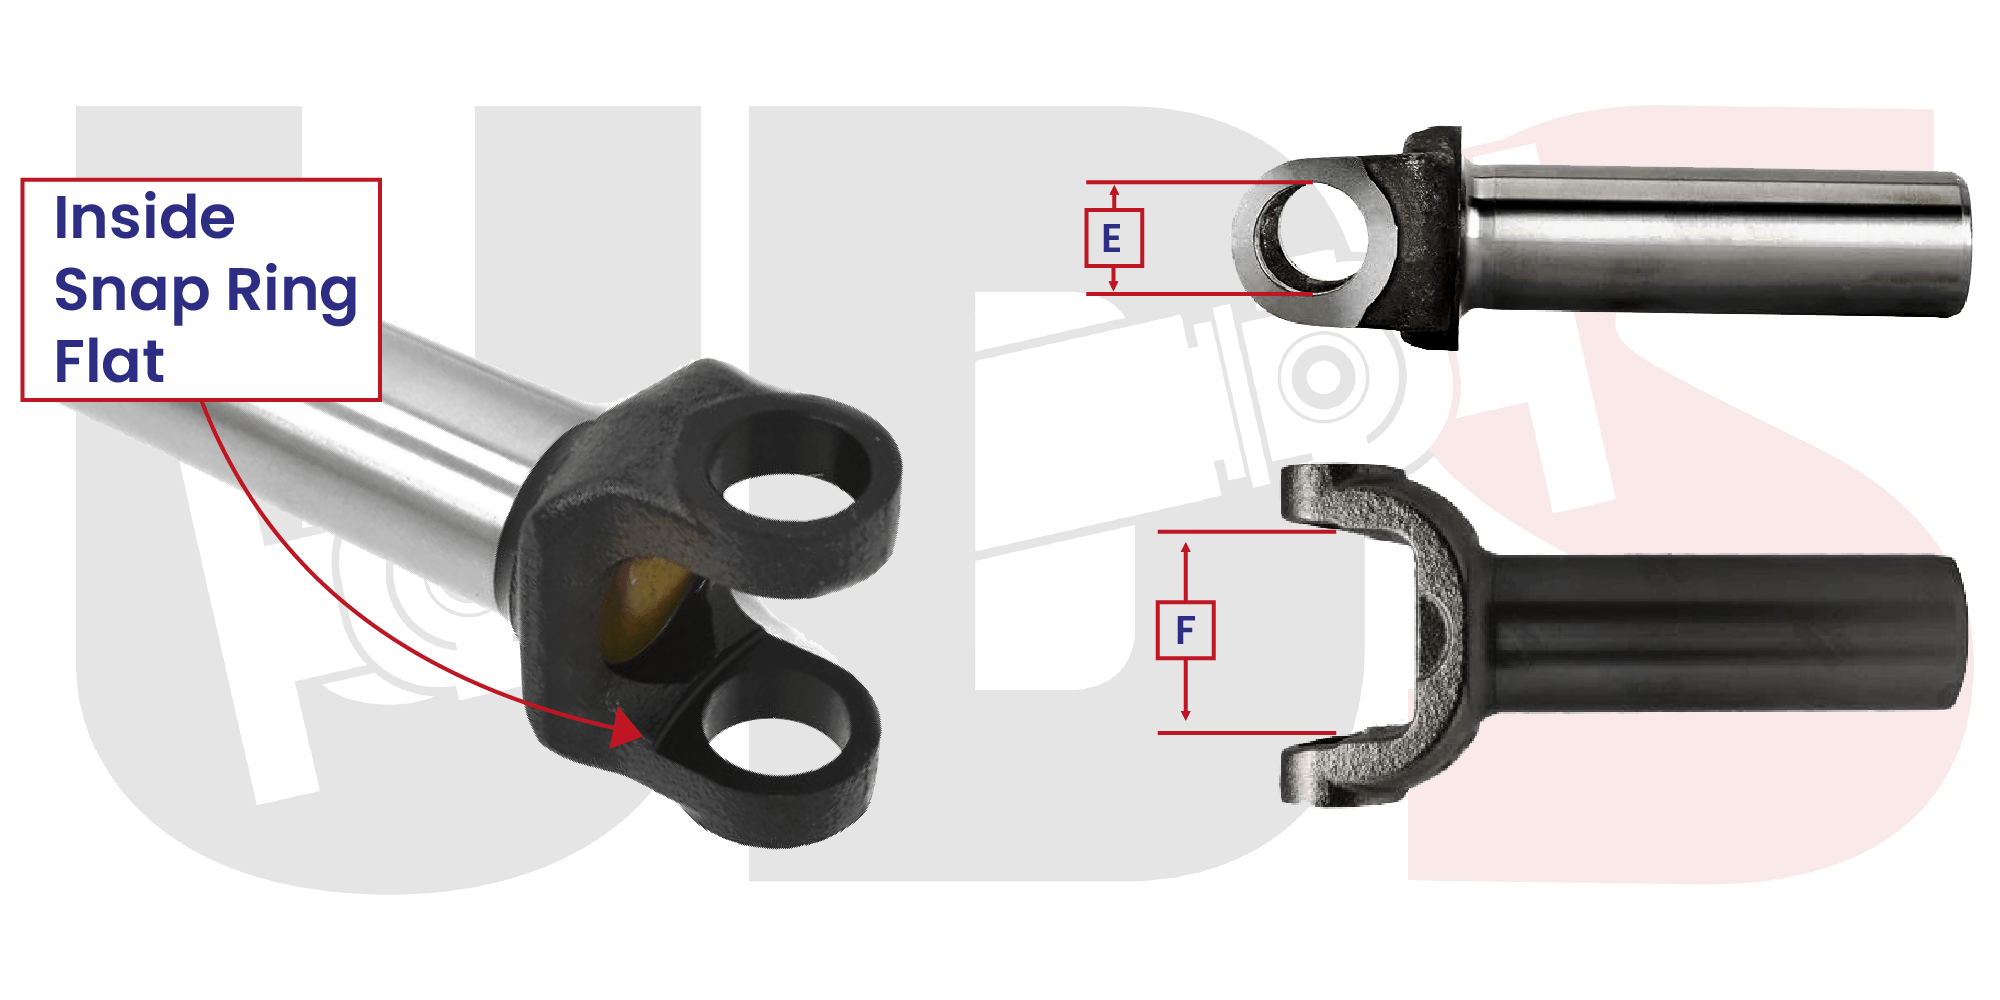
Inside Snap Ring Style Transmission Slip Yoke

E.) Cap Diameter:
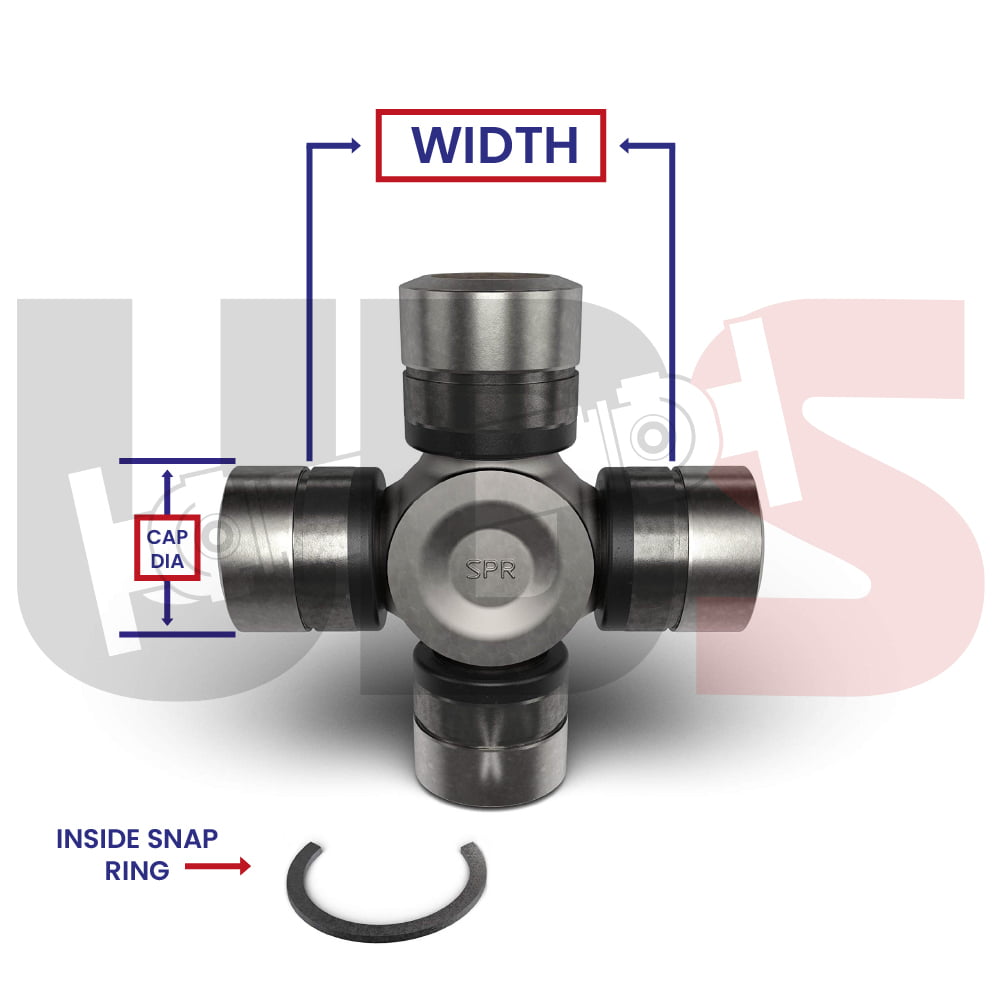
Diameter measured over bearing cap space.

F.) Width:
Distance Measured Between Machined Flats

Common Inside Snap Ring U-joint Sizes and series

Series Width Cap Diameter
7260 CHRYSLER
2 1/8″ = 2.125
1 5/64″ = 1.078
7290 CHRYSLER
2 5/8″ = 2.625
1 1/8″ = 1.125
3R GM
2 9/16″ = 2.563
1 1/8″ = 1.125
Inside Snap Ring Style Transmission Slip Yoke form

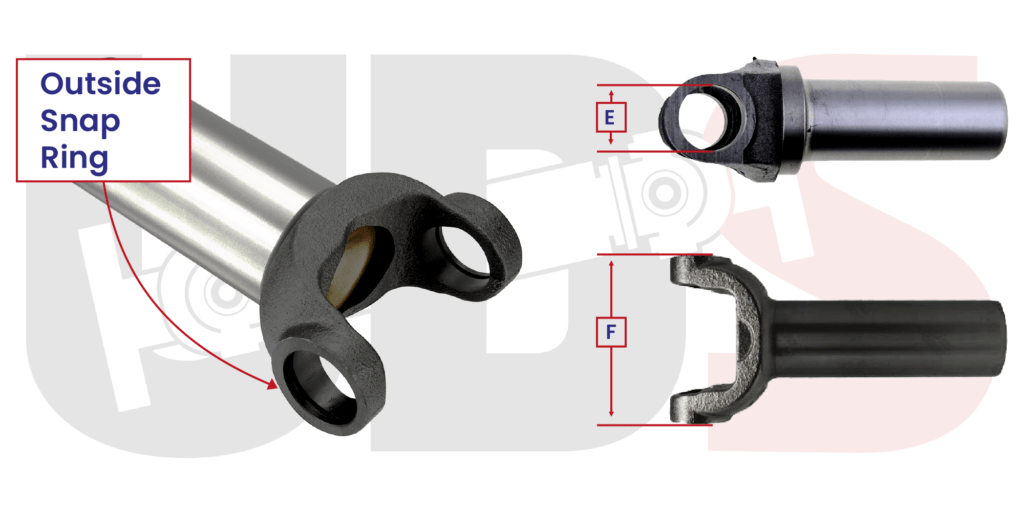
Outside Snap Ring Style Transmission Slip Yoke

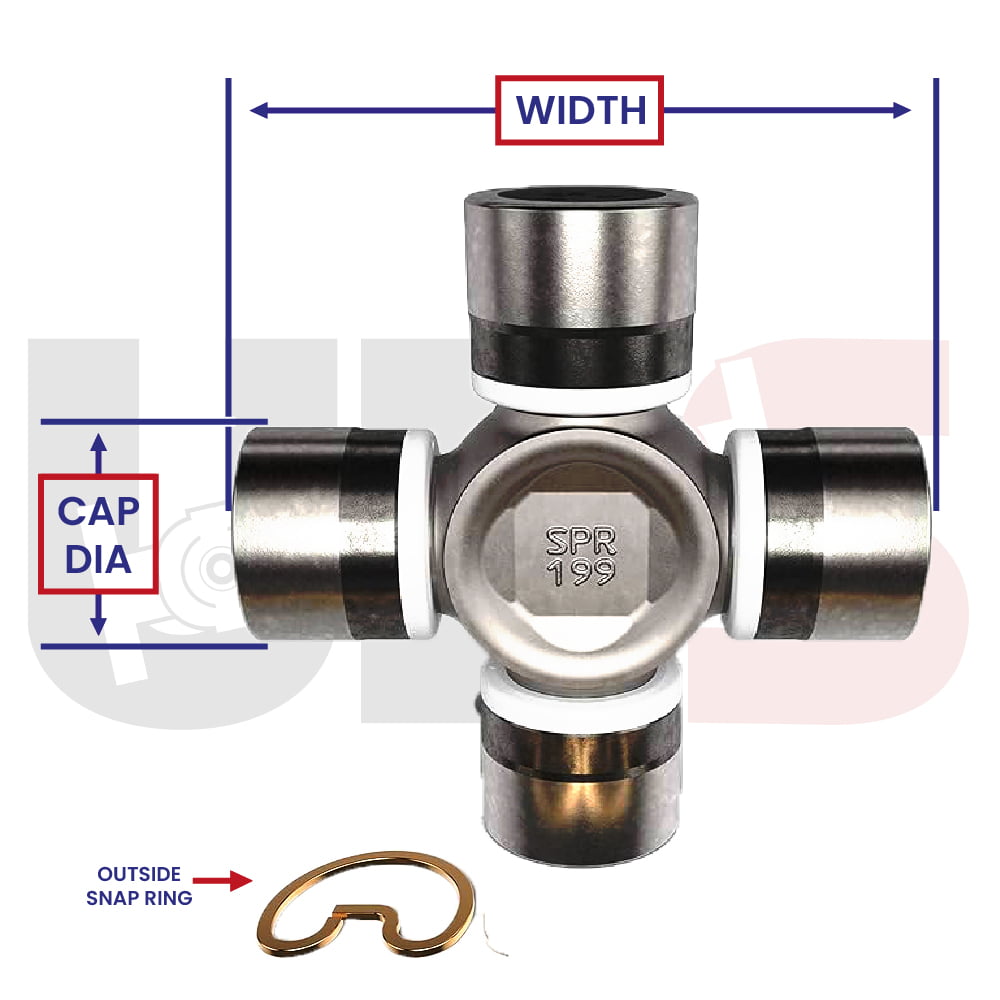
E.) Cap Diameter:
Diameter measured over bearing cap space.

F.) Width:
Distance measured over compressed bearing cap.

Common Outside Snap Ring U-joint Sizes and series

Series Width Cap Diameter
1210
2 7/16″ = 2.438
1 1/16″ = 1.063
1310
3 7/32″ = 3.219
1 1/16″ = 1.063
1310 FORD*
3 7/32″ = 3.219
1 1/8″ = 1.125
1330
3 5/8″ = 3.625
1 1/16″ = 1.063
1330 FORD*
3 5/8″ = 3.625
1 1/8″ = 1.125
1350
3 5/8″ = 3.625
1 1/16″ = 1.063
1410
4 3/16 = 4.188
1 3/16″ = 1.188
1415**
4.178
1 3/16″ = 1.188
1480
4 3/16 = 4.188
1 3/8″ = 1.375
1485**
4.178
1 3/8″ = 1.375
1550
4 31/32″ = 4.969
1 3/8″ = 1.375
1555**
4.9464
1 3/8″ = 1.375
outside Snap Ring Style Transmission Slip Yoke form

Inside Snap Ring Style End Yoke

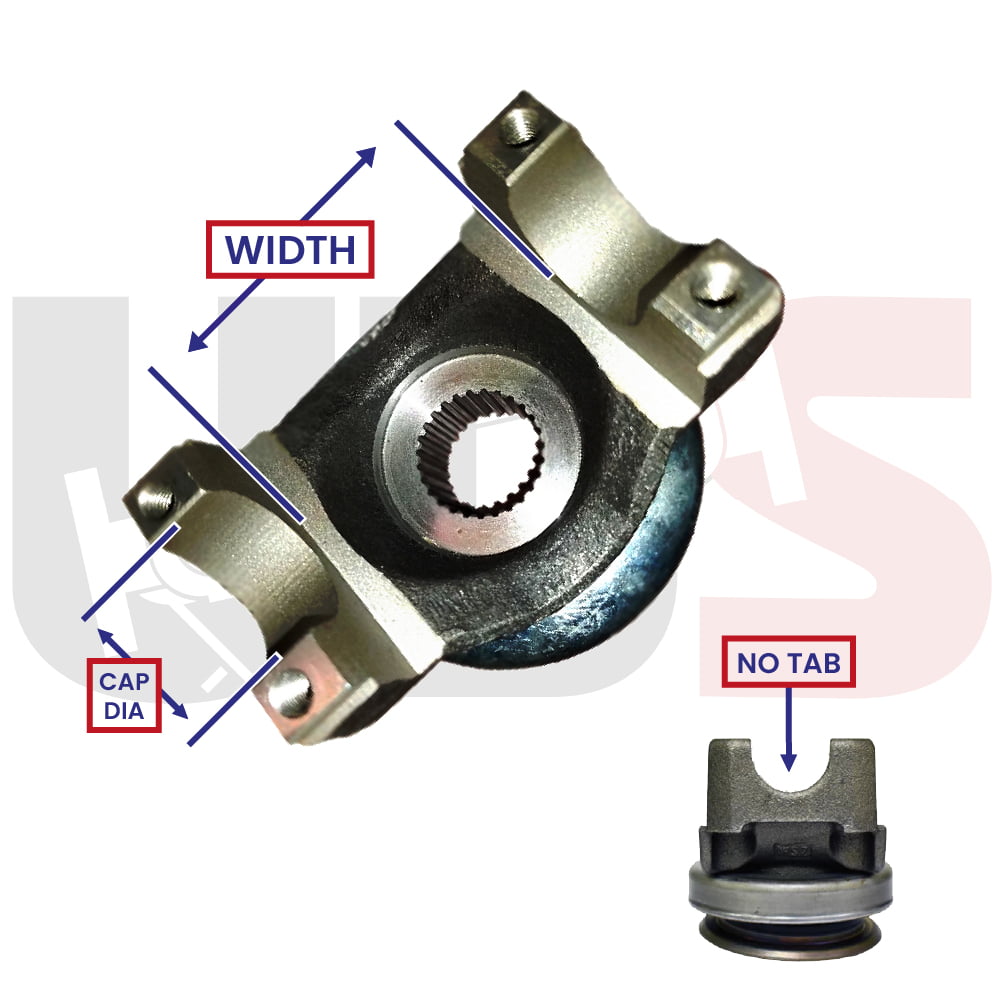
Width: measure from the inside flat of one yoke ear to the inside flat of the other ear

Cap Diameter: measure the width of the opening where the cap sits in the yoke

Common Inside Snap Ring U-Joint Sizes and series

Series Width Cap Diameter
7260 CHRYSLER
2 1/8″ = 2.125
1 5/64″ = 1.078
7290 CHRYSLER
2 5/8″ = 2.625
1 1/8″ = 1.125
3R GM
2 9/16″ = 2.563
1 1/8″ = 1.125
Inside Snap Ring Style End Yoke

Outside Snap Ring Style End Yoke

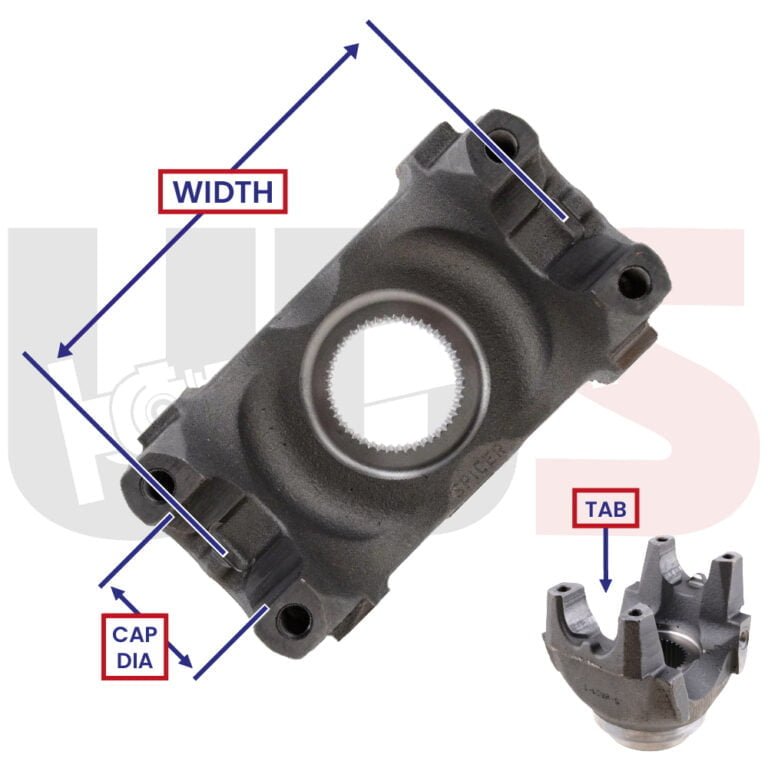
Width: measure from inside of tab to inside of tab. If you do not see a tab as shown, then you have an inside snap ring U-Joint.

Cap Diameter: measure the width of the opening where the cap sits in the yoke

Common Outside Snap Ring U-Joint Sizes and series

Series Width Cap Diameter
1210
2 7/16″ = 2.438
1 1/16″ = 1.063
1310
3 7/32″ = 3.219
1 1/16″ = 1.063
1310 FORD*
3 7/32″ = 3.219
1 1/8″ = 1.125
1330
3 5/8″ = 3.625
1 1/16″ = 1.063
1330 FORD*
3 5/8″ = 3.625
1 1/8″ = 1.125
1350
3 5/8″ = 3.625
1 1/16″ = 1.063
1410
4 3/16 = 4.188
1 3/16″ = 1.188
1415**
4.178
1 3/16″ = 1.188
1480
4 3/16 = 4.188
1 3/8″ = 1.375
1485**
4.178
1 3/8″ = 1.375
1550
4 31/32″ = 4.969
1 3/8″ = 1.375
1555**
4.9464
1 3/8″ = 1.375
outside Snap Ring Style End Yoke

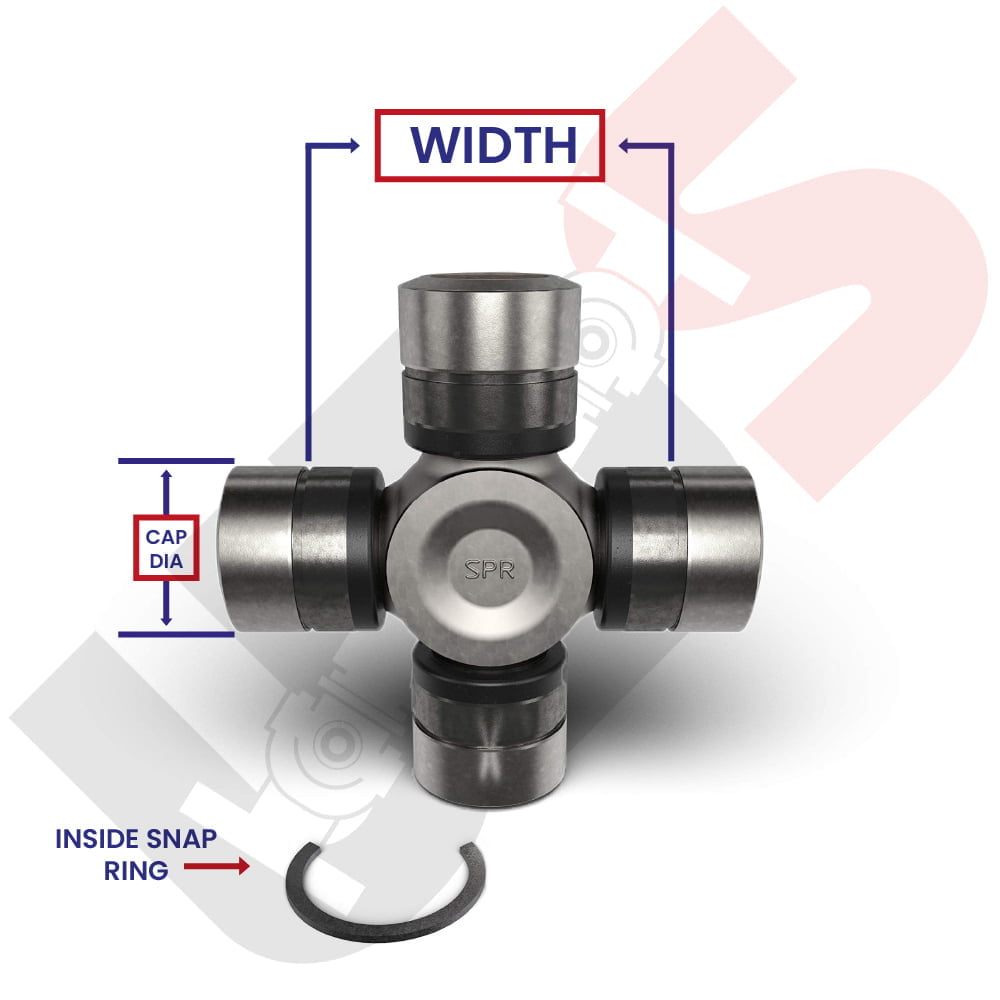
INSIDE SNAP RING STYLE U-JOINT

Width:
U Joint: Please measure the distance to the outer edge of the snap ring grooves.

End Yoke: Please measure from the inside flat of one yoke ear to the inside flat of the other ear

Use the picture above for reference

Cap Diameter:
U Joint: Simply measure the U-Joint cap.

End Yoke: Please measure the width of the opening where the cap sits in the yoke.

Use the picture above for reference

Common Inside Snap Ring U-joint Sizes and Series

Series Width Cap Diameter
7260 CHRYSLER
2 – 1⁄8 (2.125)
1 – 5⁄64 (1.078)
7290 CHRYSLER
2 – 5⁄8 (2.625)
1 – 1⁄8 (1.125)
3R GM
2 – 9⁄16 (2.563)
1 – 1⁄8 (1.125)
2R GM
2.342
1.00

OUTSIDE SNAP RING STYLE U-JOINT

Width:
U joint: Please compress the caps and measure from outside of cap to outside of cap .
End Yoke: Please measure from inside of tab to inside of tab, using the picture above for reference, If you do not see a tab as shown, then you have an inside snap ring u joint.
Use the picture above for reference

Cap Diameter:
U joint: Simply measure the U-Joint cap diameter .
End Yoke: Please measure the width of the opening where the cap sits in the yoke. use the picture above for reference
Use the picture above for reference

Common Outside Snap Ring U-joint Sizes and Series

Series Width Cap Diameter
1210
2 7/16″ = 2.438
1 1/16″ = 1.063
1310
3 7/32″ = 3.219
1 1/16″ = 1.063
1310 FORD*
3 7/32″ = 3.219
1 1/8″ = 1.125
1330
3 5/8″ = 3.625
1 1/16″ = 1.063
1330 FORD*
3 5/8″ = 3.625
1 1/8″ = 1.125
1350
3 5/8″ = 3.625
1 3/16″ = 1.188
1410
4 3/16 = 4.188
1 3/16″ = 1.188
1415**
4.178
1 3/16″ = 1.188
1480
4 3/16 = 4.188
1 3/8″ = 1.375
1485**
4.178
1 3/8″ = 1.375
1550
4 31/32″ = 4.969
1 3/8″ = 1.375
1555**
4.9464
1 3/8″ = 1.375

Create your new account.

0