The Black Friday is Here! 50% OFF with code BLACKFRIDAY24

PTO & Agriculture

Elevate Agricultural Productivity with UDS's Precision Technology

Discover the perfect blend of power, efficiency, and reliability with UDS’s PTO & Agriculture Driveshafts. Rooted in a rich history of innovation, our driveshaft solutions have been enhancing agricultural operations for generations. From traditional farming to cutting-edge agricultural technology, UDS stands as a trusted partner, providing driveshafts that are tailor-made for the unique demands of PTO (Power Take-Off) applications and the agricultural sector.

Heritage of Agricultural Excellence UDS's journey in the PTO & Agriculture Driveshaft sector dates back to 2018

Our commitment to excellence became synonymous with increased agricultural efficiency. Over the years, we’ve evolved with the changing landscape of farming technology, ensuring our driveshafts remain at the forefront of precision and performance.

Tailored Solutions for Agricultural Innovation As agriculture becomes increasingly sophisticated, UDS is dedicated to providing tailored driveshaft solutions that align seamlessly with the diverse requirements of modern farming equipment. Whether it’s powering implements through a PTO or ensuring smooth operation in agricultural machinery, our driveshafts are designed to meet the challenges of the field.

Of our customers Satisfaction
0 %

Customer-Centric Approach At UDS, we understand the pivotal role that reliable machinery plays in agricultural success. Our commitment to customer satisfaction goes beyond providing driveshafts; it extends to supporting the efficiency and productivity of your farming operations.

Benefits of Choosing UDS PTO & Agriculture Driveshafts:

Realiability and Longevity

Our driveshafts are built to last, ensuring reliable performance throughout the agricultural seasons.

Customized Solutions

Tailored to the specific needs of your agricultural equipment, UDS driveshafts enhance overall efficiency


Technological Innovation

Stay ahead of the curve with UDS, as we incorporate the latest materials and manufacturing techniques into our driveshafts.


Expert Support and Consultation

Our team of experts provides comprehensive technical support and consultation, ensuring you have the knowledge and assistance you need.


Cost-Effective Operations

Designed to reduce maintenance needs and energy consumption, contributing to lower operational costs over time.


Choose UDS for PTO & Agriculture Driveshafts, where precision technology meets the demands of modern agriculture, cultivating efficiency and productivity in every field. Experience the difference with UDS.

Scroll to Top

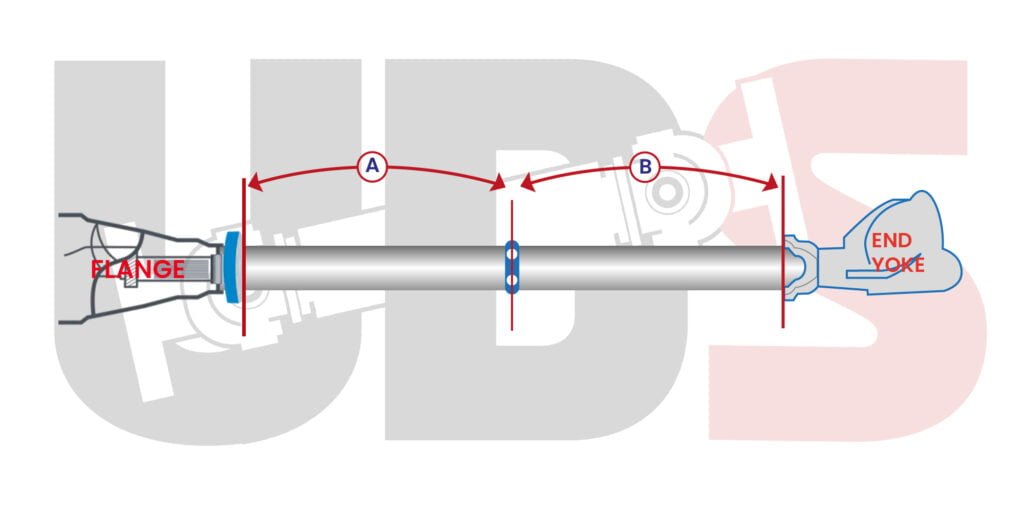
Two Piece Driveshaft: Flange

Two Piece Driveshaft Measuring Flange to End Yoke

IMPORTANT: Vehicle must be on a level surface with suspension at normal ride height for proper measurements. When measuring to the center bearing, measure to the center of the round or slotted carrier bearing bolt holes.  Many carrier mounts are slotted for adjustment.

DriveShaft Length

Measurement (A) :
Measure from the transmission output flange face to the center of the carrier bearing bolt holes.

Measurement (B) :
Measure from the center of carrier bearing bolt holes to the flats (center of u-joint or flats) on the end yoke at the differential.

Two Piece Driveshaft Measuring Flange To Flange

IMPORTANT: Vehicle must be on a level surface with suspension at normal ride height for proper measurements. When measuring to the center bearing, measure to the center of the round or slotted carrier bearing bolt holes.  Many carrier mounts are slotted for adjustment.

DriveShaft Length

Measurement (A):
Measure from the transmission output flange face to the center of the carrier bearing bolt holes.

Measurement (B) :
Measure from the center of carrier bearing bolt holes to the face of the flange on the differential.

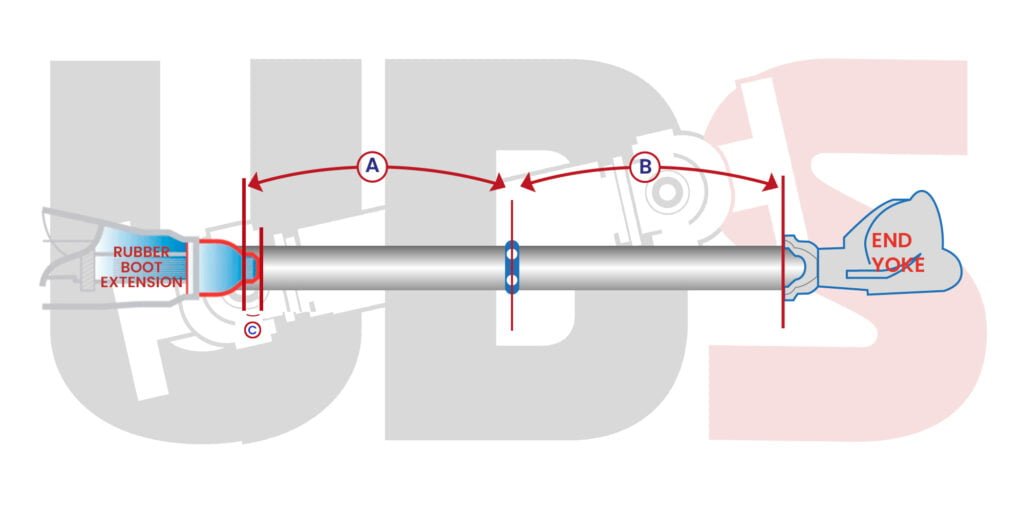
Two Piece Driveshaft: Rubber Boot Extension

Two Piece Driveshaft Measuring Rubber Boot Extension to End Yoke

IMPORTANT: Vehicle must be on a level surface with suspension at normal ride height for proper measurements. When measuring to the center bearing, measure to the center of the round or slotted carrier bearing bolt holes.  Many carrier mounts are slotted for adjustment.

DriveShaft Length

Measurement (A) :
Measure from end of rubber boot extension on the transmission to the center of the carrier bearing bolt holes.

Measurement (B) :
Measure from the center of carrier bearing bolt holes to the end yoke flats (center of u-joint or flats) on the differential.

Measurement (C) :
Measure from the end of the rubber boot extension to end the of the transmission output/spline. If spline is recessed in rubber boot Extension, enter ø.

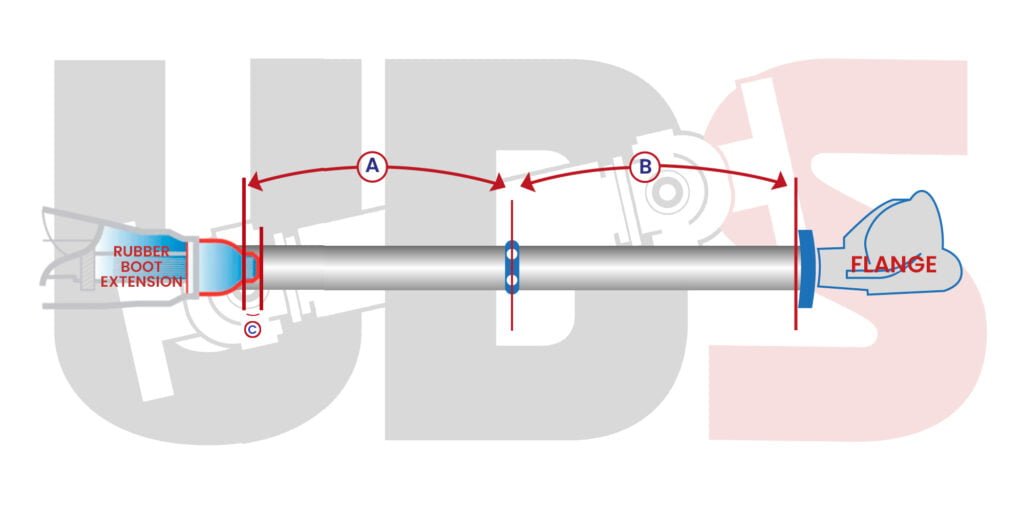
Two Piece Driveshaft Measuring Rubber Boot Extension to Flange

IMPORTANT: Vehicle must be on a level surface with suspension at normal ride height for proper measurements. When measuring to the center bearing, measure to the center of the round or slotted carrier bearing bolt holes.  Many carrier mounts are slotted for adjustment.

DriveShaft Length

Measurement (A) :
Measure from end of rubber boot extension on the transmission to the center of the carrier bearing bolt holes.

Measurement (B) :
Measure from the center of carrier bearing bolt holes to the flange face on the differential.

Measurement (C) :
Measure from the end of the rubber boot extension to end the of the transmission output/spline. If spline is recessed in rubber boot Extension, enter ø.

Two Piece Driveshaft: End Yoke

Two Piece Driveshaft Measuring End Yoke To End Yoke

IMPORTANT: Vehicle must be on a level surface with suspension at normal ride height for proper measurements. When measuring to the center bearing, measure to the center of the round or slotted carrier bearing bolt holes.  Many carrier mounts are slotted for adjustment.

DriveShaft Length

Measurement (A):
from the transmission output end yoke (center of u-joint or flats) to the center of the carrier bearing bolt holes.

Measurement (B):
Measure from the center of carrier bearing bolt holes to the end yoke (center of u-joint or flats) on the differential.

Two Piece Driveshaft Measuring End Yoke To Flange

IMPORTANT: Vehicle must be on a level surface with suspension at normal ride height for proper measurements. When measuring to the center bearing, measure to the center of the round or slotted carrier bearing bolt holes.  Many carrier mounts are slotted for adjustment.

DriveShaft Length

Measurement (A) :
Measure from the transmission output end yoke (center of u-joint or flats) to the center of the carrier bearing bolt holes.

Measurement (B) :
Measure from the center of carrier bearing bolt holes to the face of the flange on the differential.

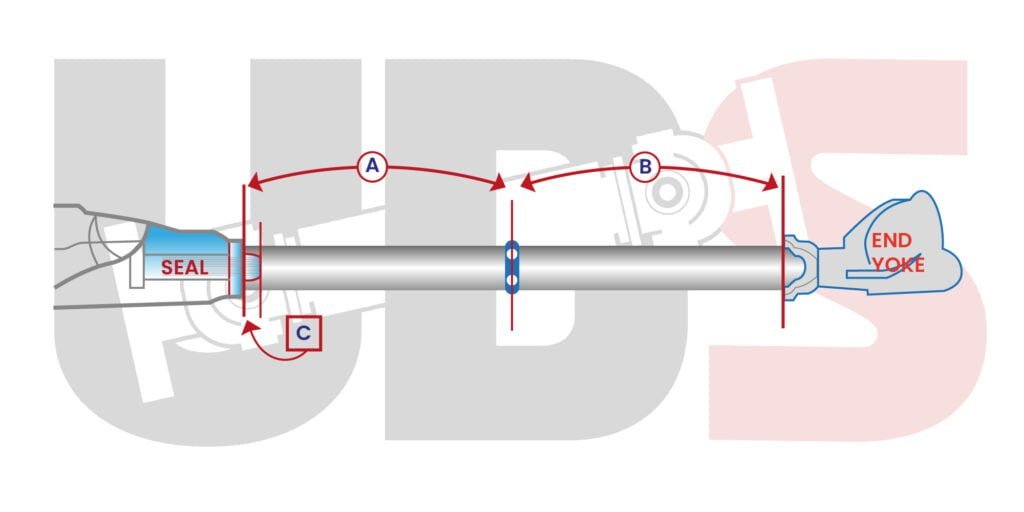
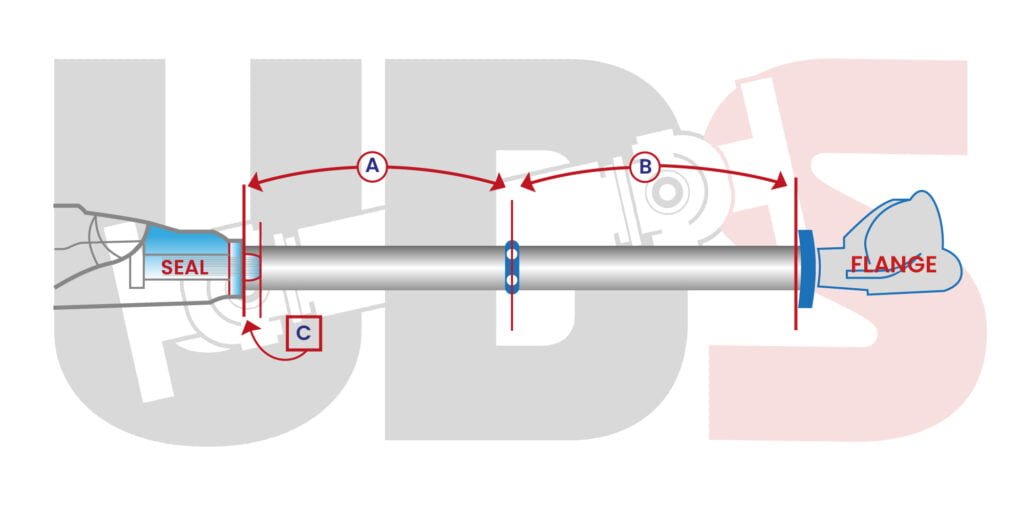
Two Piece Driveshaft: Seal

Seal to End Yoke

 IMPORTANT: Vehicle must be on a level surface with suspension at normal ride height for proper measurements. When measuring to the center bearing, measure to the center of the round or slotted carrier bearing bolt holes.  Many carrier mounts are slotted for adjustment.

DriveShaft Length

Measurement (A) – Front Driveshaft Length:
Measure from end of rubber seal on the transmission to the center of the carrier bearing bolt holes.

Measurement (B) – Rear Driveshaft Length:
Measure from the center of carrier bearing bolt holes to the end yoke flats (center of ujoint) on the differential.

Spline Extrusion Length

Measurement (C) – Spline Extrusion Length:
Measure from rubber seal to end the of the transmission output/spline. If spline is recessed in rubber seal, enter ø.

Seal to Flange

 IMPORTANT: Vehicle must be on a level surface with suspension at normal ride height for proper measurements. When measuring to the center bearing, measure to the center of the round or slotted carrier bearing bolt holes.  Many carrier mounts are slotted for adjustment.

DriveShaft Length

Measurement (A) – Front Driveshaft Length:
Measure from end of rubber seal on the transmission to the center of the carrier bearing bolt holes.

Measurement (B) – Rear Driveshaft Length:
Measure from the center of carrier bearing bolt holes to the end yoke flats (center of ujoint) on the differential.

Spline Extrusion Length

Measurement (C) – Spline Extrusion Length:
Measure from rubber seal to end the of the transmission output/spline. If spline is recessed in rubber seal, enter ø.

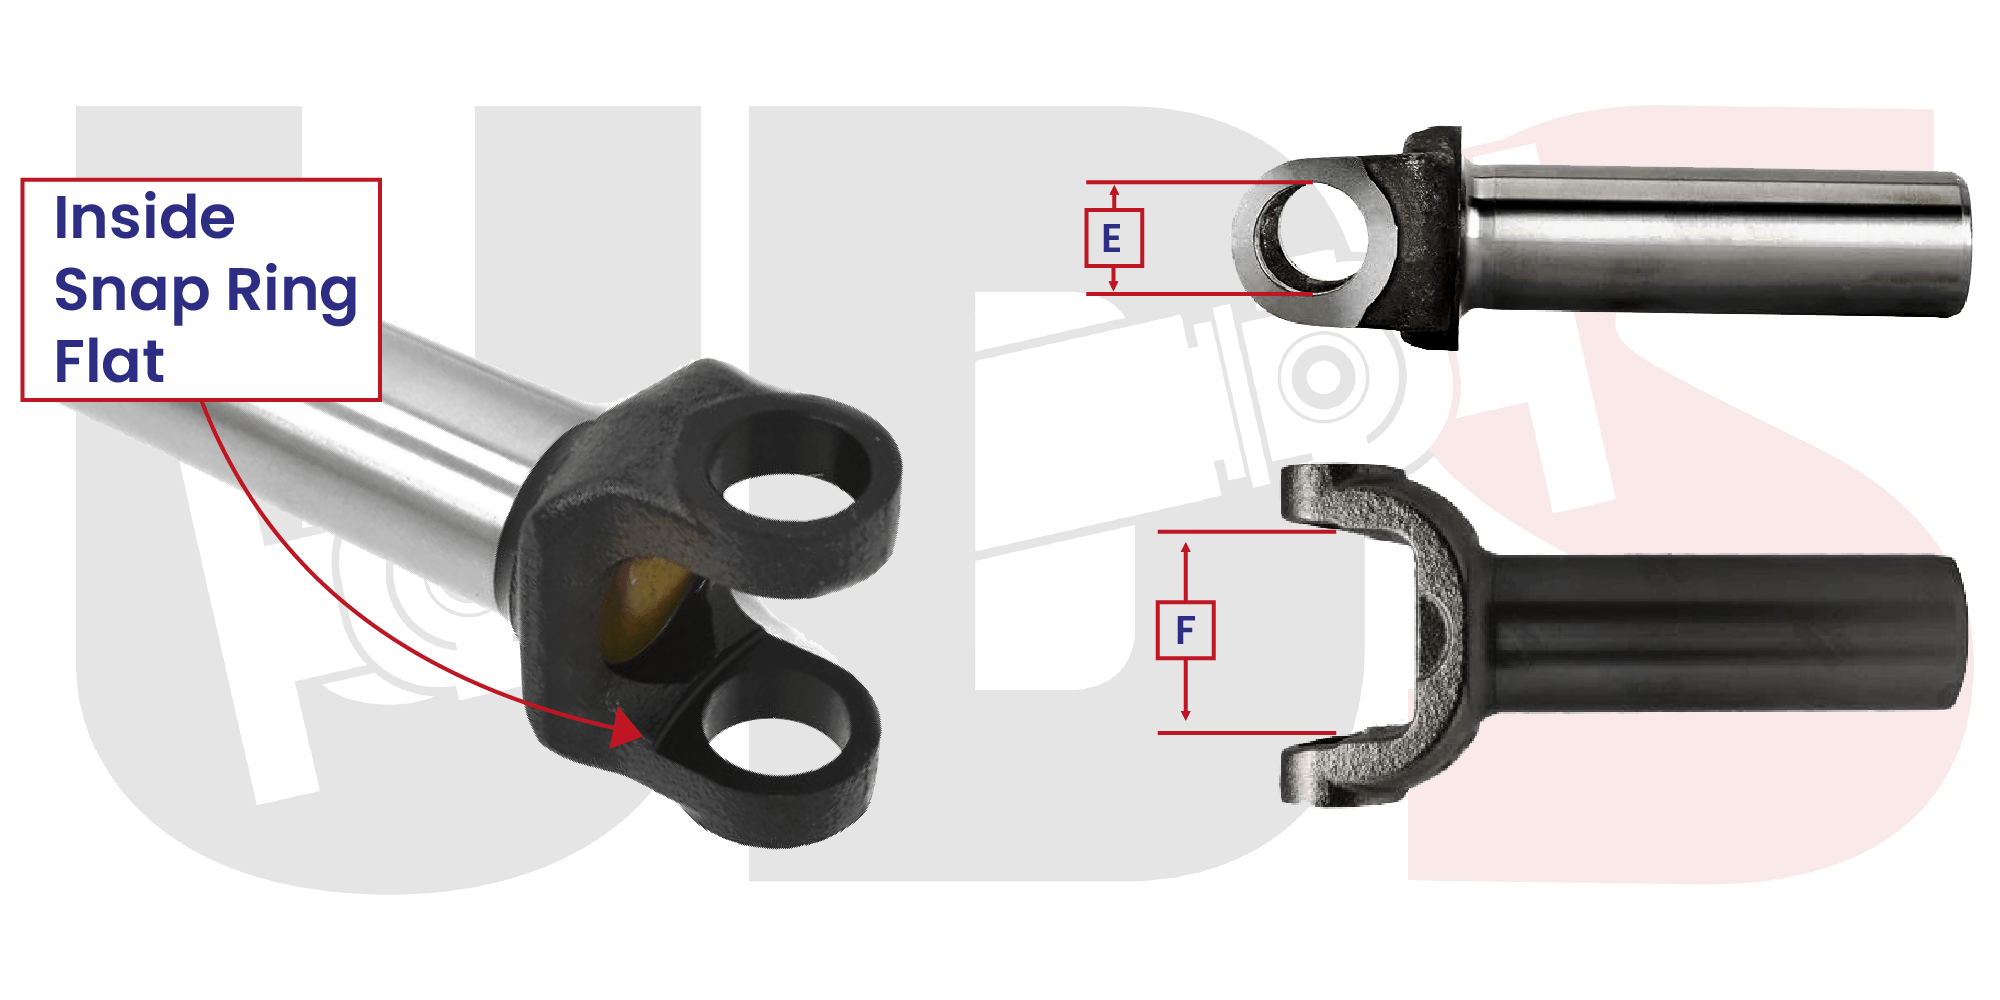
Inside Snap Ring Style Transmission Slip Yoke

E.) Cap Diameter:
Diameter measured over bearing cap space.

F.) Width:
Distance Measured Between Machined Flats

Common Inside Snap Ring U-joint Sizes and series

Series Width Cap Diameter
7260 CHRYSLER
2 1/8″ = 2.125
1 5/64″ = 1.078
7290 CHRYSLER
2 5/8″ = 2.625
1 1/8″ = 1.125
3R GM
2 9/16″ = 2.563
1 1/8″ = 1.125
Inside Snap Ring Style Transmission Slip Yoke form

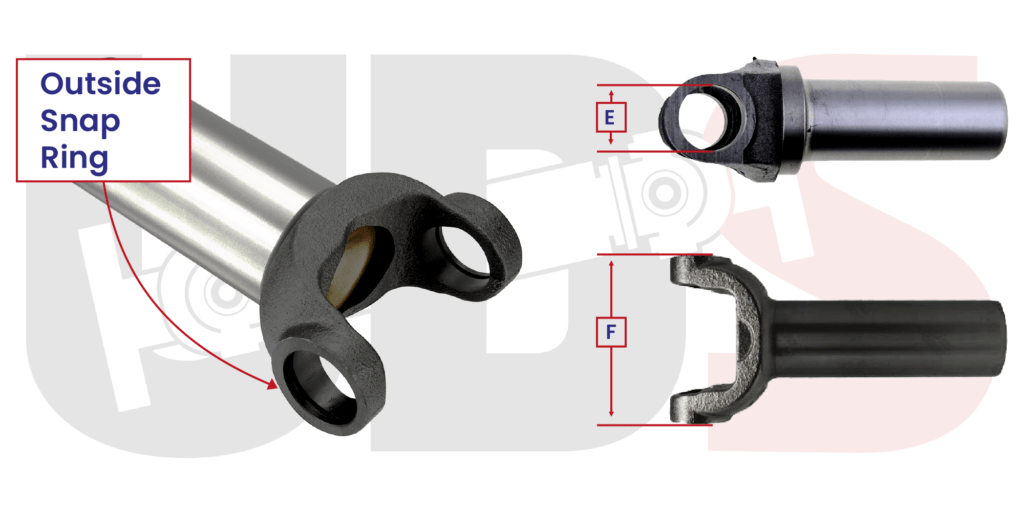
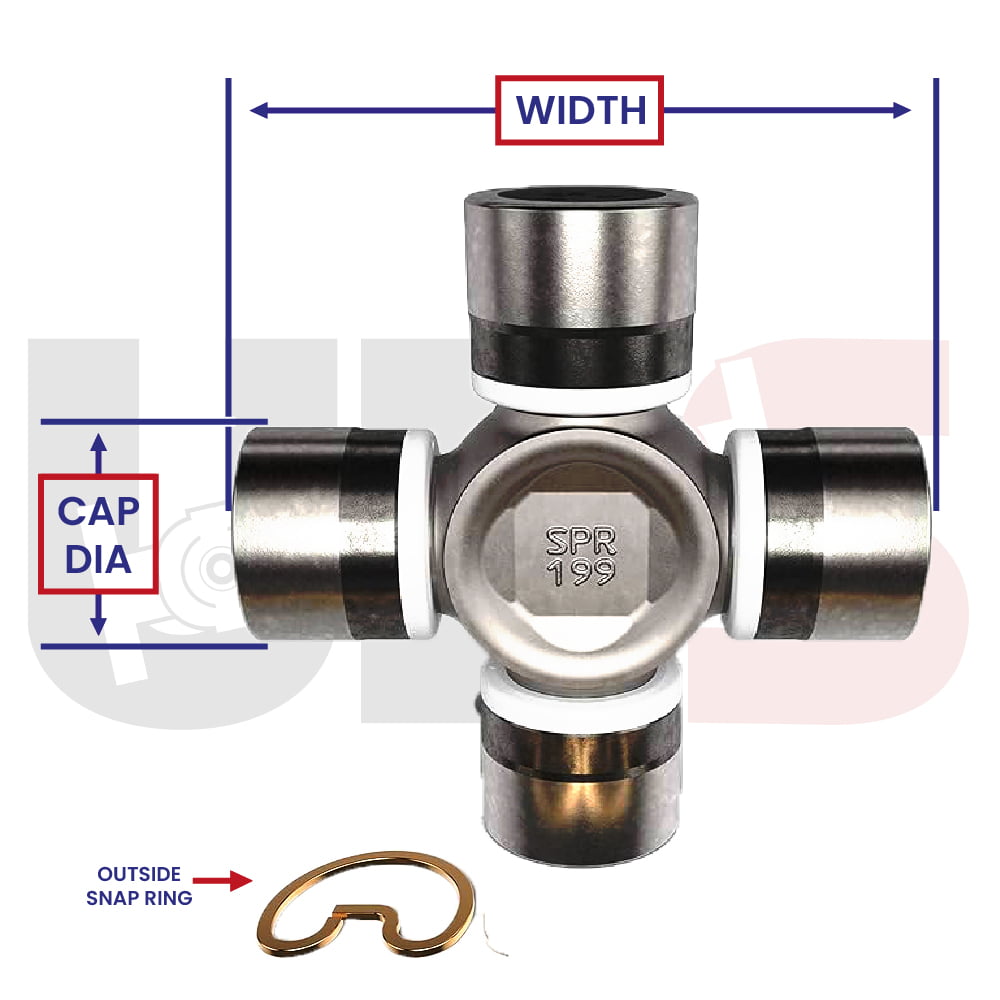
Outside Snap Ring Style Transmission Slip Yoke

E.) Cap Diameter:
Diameter measured over bearing cap space.

F.) Width:
Distance measured over compressed bearing cap.

Common Outside Snap Ring U-joint Sizes and series

Series Width Cap Diameter
1210
2 7/16″ = 2.438
1 1/16″ = 1.063
1310
3 7/32″ = 3.219
1 1/16″ = 1.063
1310 FORD*
3 7/32″ = 3.219
1 1/8″ = 1.125
1330
3 5/8″ = 3.625
1 1/16″ = 1.063
1330 FORD*
3 5/8″ = 3.625
1 1/8″ = 1.125
1350
3 5/8″ = 3.625
1 1/16″ = 1.063
1410
4 3/16 = 4.188
1 3/16″ = 1.188
1415**
4.178
1 3/16″ = 1.188
1480
4 3/16 = 4.188
1 3/8″ = 1.375
1485**
4.178
1 3/8″ = 1.375
1550
4 31/32″ = 4.969
1 3/8″ = 1.375
1555**
4.9464
1 3/8″ = 1.375
outside Snap Ring Style Transmission Slip Yoke form

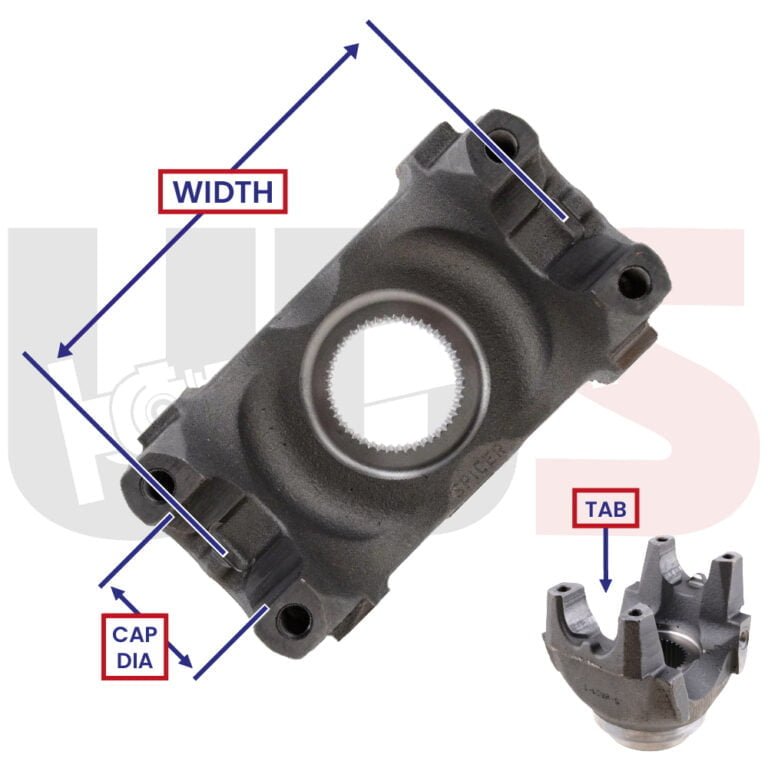
Inside Snap Ring Style End Yoke

Width: measure from the inside flat of one yoke ear to the inside flat of the other ear

Cap Diameter: measure the width of the opening where the cap sits in the yoke

Common Inside Snap Ring U-Joint Sizes and series

Series Width Cap Diameter
7260 CHRYSLER
2 1/8″ = 2.125
1 5/64″ = 1.078
7290 CHRYSLER
2 5/8″ = 2.625
1 1/8″ = 1.125
3R GM
2 9/16″ = 2.563
1 1/8″ = 1.125
Inside Snap Ring Style End Yoke

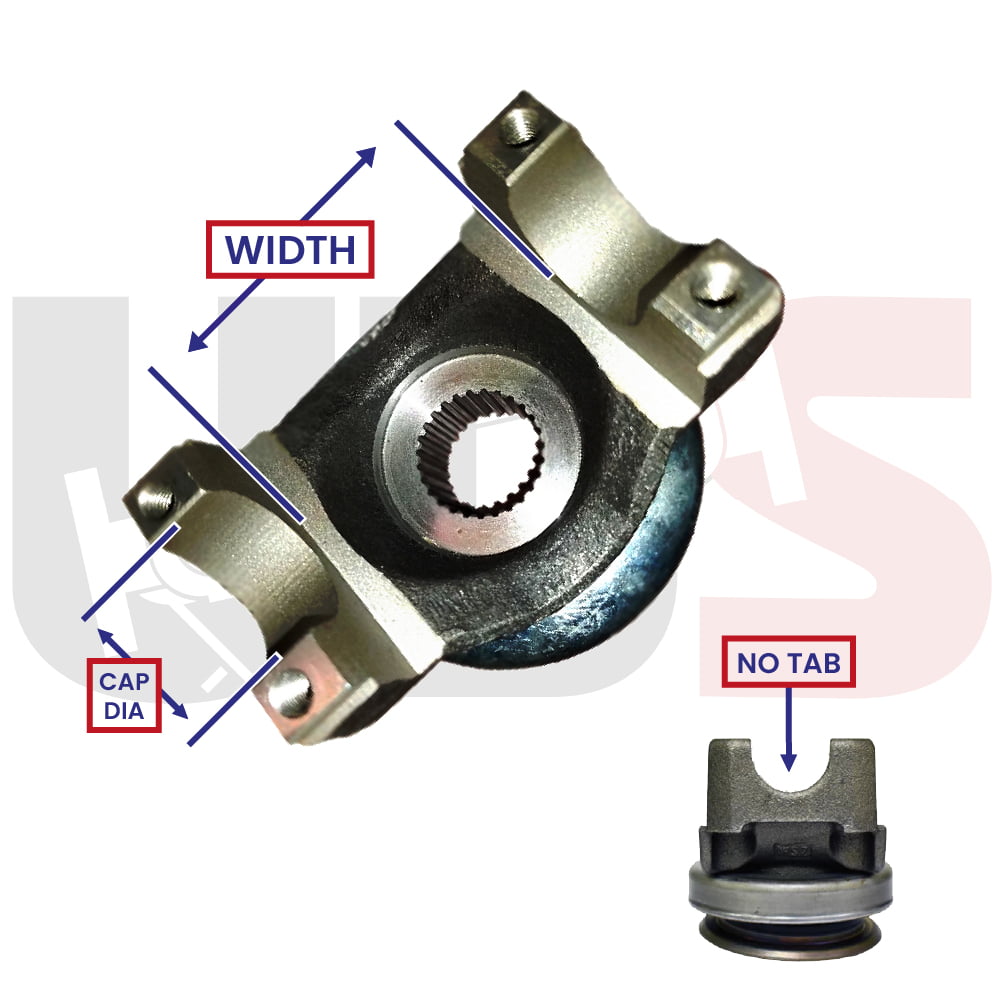
Outside Snap Ring Style End Yoke

Width: measure from inside of tab to inside of tab. If you do not see a tab as shown, then you have an inside snap ring U-Joint.

Cap Diameter: measure the width of the opening where the cap sits in the yoke

Common Outside Snap Ring U-Joint Sizes and series

Series Width Cap Diameter
1210
2 7/16″ = 2.438
1 1/16″ = 1.063
1310
3 7/32″ = 3.219
1 1/16″ = 1.063
1310 FORD*
3 7/32″ = 3.219
1 1/8″ = 1.125
1330
3 5/8″ = 3.625
1 1/16″ = 1.063
1330 FORD*
3 5/8″ = 3.625
1 1/8″ = 1.125
1350
3 5/8″ = 3.625
1 1/16″ = 1.063
1410
4 3/16 = 4.188
1 3/16″ = 1.188
1415**
4.178
1 3/16″ = 1.188
1480
4 3/16 = 4.188
1 3/8″ = 1.375
1485**
4.178
1 3/8″ = 1.375
1550
4 31/32″ = 4.969
1 3/8″ = 1.375
1555**
4.9464
1 3/8″ = 1.375
outside Snap Ring Style End Yoke

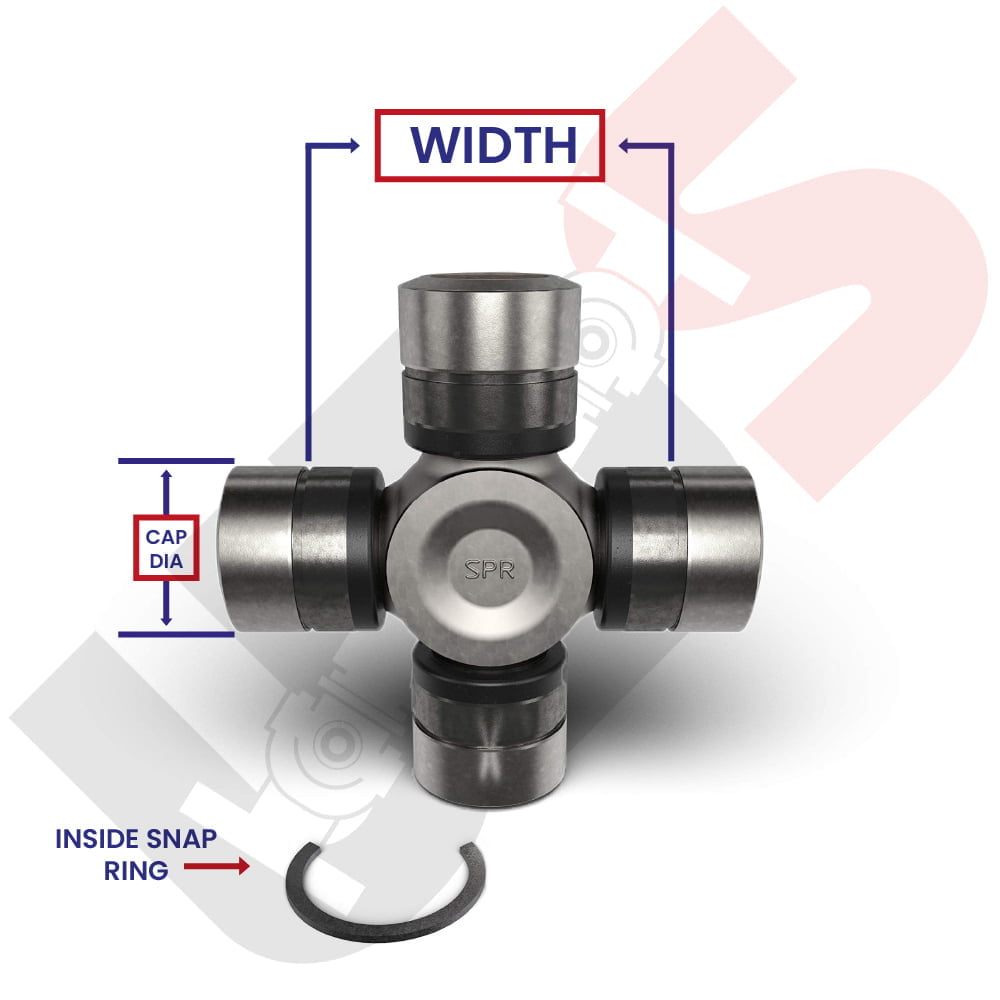
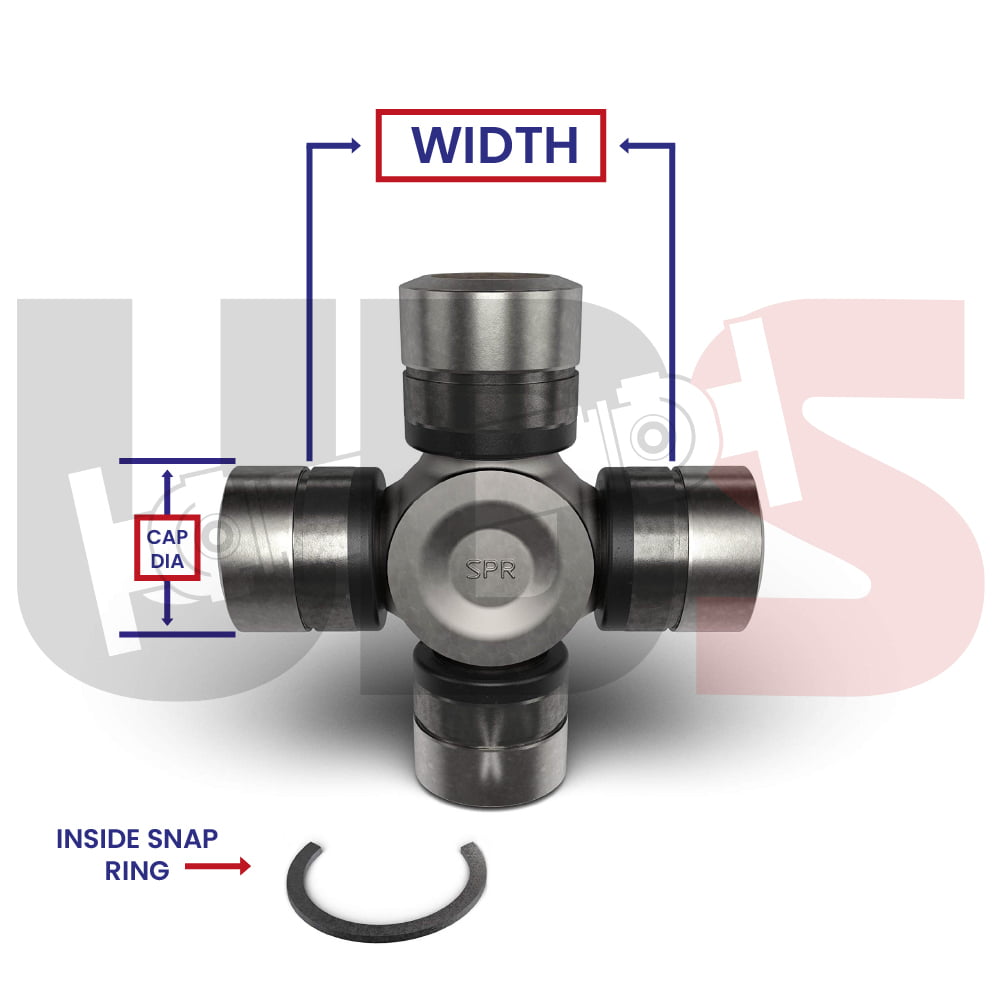
INSIDE SNAP RING STYLE U-JOINT

Width:
U Joint: Please measure the distance to the outer edge of the snap ring grooves.

End Yoke: Please measure from the inside flat of one yoke ear to the inside flat of the other ear

Use the picture above for reference

Cap Diameter:
U Joint: Simply measure the U-Joint cap.

End Yoke: Please measure the width of the opening where the cap sits in the yoke.

Use the picture above for reference

Common Inside Snap Ring U-joint Sizes and Series

Series Width Cap Diameter
7260 CHRYSLER
2 – 1⁄8 (2.125)
1 – 5⁄64 (1.078)
7290 CHRYSLER
2 – 5⁄8 (2.625)
1 – 1⁄8 (1.125)
3R GM
2 – 9⁄16 (2.563)
1 – 1⁄8 (1.125)
2R GM
2.342
1.00

OUTSIDE SNAP RING STYLE U-JOINT

Width:
U joint: Please compress the caps and measure from outside of cap to outside of cap .
End Yoke: Please measure from inside of tab to inside of tab, using the picture above for reference, If you do not see a tab as shown, then you have an inside snap ring u joint.
Use the picture above for reference

Cap Diameter:
U joint: Simply measure the U-Joint cap diameter .
End Yoke: Please measure the width of the opening where the cap sits in the yoke. use the picture above for reference
Use the picture above for reference

Common Outside Snap Ring U-joint Sizes and Series

Series Width Cap Diameter
1210
2 7/16″ = 2.438
1 1/16″ = 1.063
1310
3 7/32″ = 3.219
1 1/16″ = 1.063
1310 FORD*
3 7/32″ = 3.219
1 1/8″ = 1.125
1330
3 5/8″ = 3.625
1 1/16″ = 1.063
1330 FORD*
3 5/8″ = 3.625
1 1/8″ = 1.125
1350
3 5/8″ = 3.625
1 3/16″ = 1.188
1410
4 3/16 = 4.188
1 3/16″ = 1.188
1415**
4.178
1 3/16″ = 1.188
1480
4 3/16 = 4.188
1 3/8″ = 1.375
1485**
4.178
1 3/8″ = 1.375
1550
4 31/32″ = 4.969
1 3/8″ = 1.375
1555**
4.9464
1 3/8″ = 1.375

Create your new account.